Marccus blog have moved to Marccus.net. Do visit there!! =D

Pages

Showing posts with label IT. Show all posts

5.28.2009

Bandwidth?

Am now in the the last class of my first module. First time connected to their Wifi. Just a sharing =)

Okie, class start.


>>

5.12.2009

My Driving Licence arrived.

As I've online renew'ed my Driving License on Sunday (Click here to show how to do it), today, which is 2 days after that, I've received the post for the new driving license. =)


The envelope


Hmm.. No special gift inside =X


The other envelope with the new license


Ta daa~~ Here it is


So, how you feel about this service?
Better than que up long long in post office huh?
XD

Ok lar, hand clap for this service lar, Haha


>>

5.10.2009

Renew Driving License Online using Myeg Service

There is one night last week, little marccus was stopped by police ko ko in a lorong to check the IC and License. Lucky they are genuine one, if not little marccus will probably lost his virginity =X

At that moment, the one checking my Driving license one tell me "Jaga ar, mahu sampai dah."
He was actually saying the Driving license is nearly expired. =X
Then only I realise, OmG, the expired date is on 13 May 2009. Just left few days only...

Lucky being checked by them, if not I surely forget about go renew my licence. XD
Since the date is near, and I don't have time to go post office to wait for the long que for renewal.
I then go for online renewal in MyEg, which I did the same thing last year as well. XD
I believe most of you have not did this before, may be cause of the not so trust the security transaction, and how to get the license. It cost me in a total MYR 38.00 for One Year renewal.


So here I show how it done. =)
(Please make your web browser to unblock pop-out window for a moment. The process will require two windows to pop-out.)


- - - - - - - - - - - - - - - - - - - -
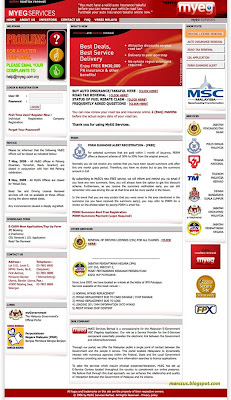
1. Go to http://www.myeg.com.my to go to Myeg main page. And click for the Driving License Renewal at the top right side under Shortcuts category. You may browse inside the mainpage for what you can do in there.

Click to enlarge

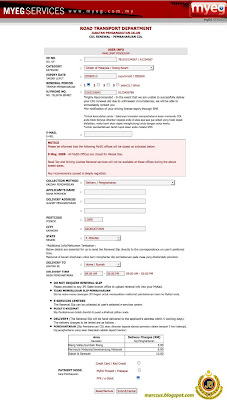
2. Once you go in, you can then fill in the details there. You can choose the collection method (whethere want them to post to you or not) and Payment method (Credit card or FPX). So I am using Public Bank e-Banking Transaction, So I choose FPX.
Click submit after complete your process.

Click to enlarge


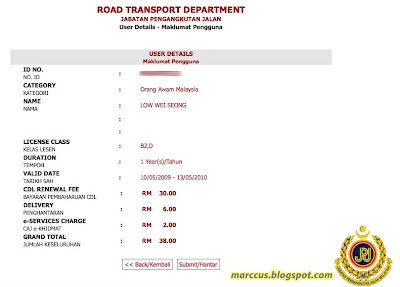
3. It will then lead you for a check-out page and show you to sum you need to pay. Check your details. If nothing goes wrong then click submit.

Click to enlarge

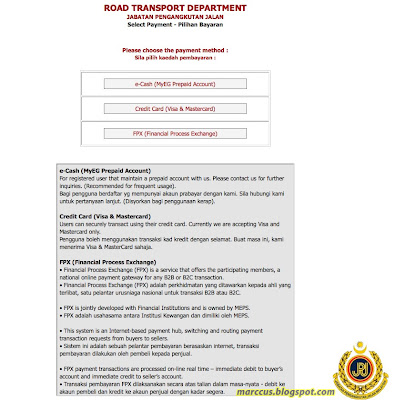
4. After that, it is time for you to choose your payment method. I know it is very stupid, as at the first form already ask you to choose your method. XD Nevermind, give them some time to be smarter. Wakaka. So, again, I use e-Banking, then I choose FPX.
Click
on it, softly.

Click to enlarge

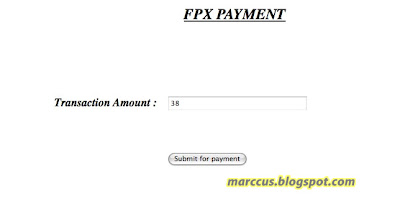
5. It will then show you the total transaction amount. If you havn't make your browser to allow pop-out window, there will be message showing out. Cause at this moment there will be a window desperately coming out. =X
Click on submit for payment when ready.

Click to enlarge
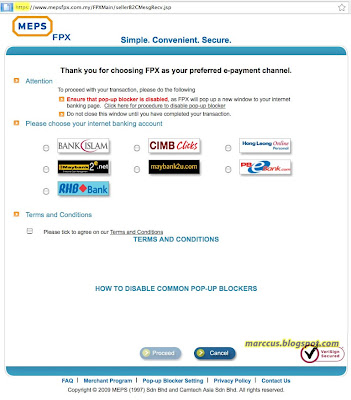
6. This window will let you choose what bank you are gonna make your payment. and make sure the URL is showing https, and not http only, for security. So now choose your bank, and click the term & condition box, then Click Proceed.


Click to enlarge

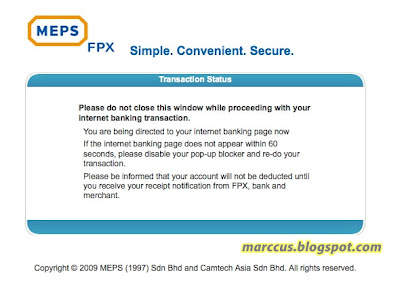
7.
Arr... this window will then ask you not to closed it. So.. left it there lar.
Actually at the same moment, your bank login page will pop-out. Go look for it.

Click to enlarge

8. And here is the login page for Public Bank. Again, before login, Check for https in URL. If it show http, Do NOT log in.

Click to enlarge
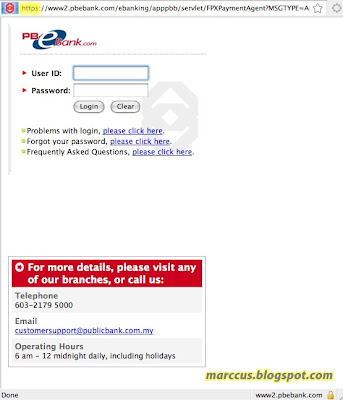


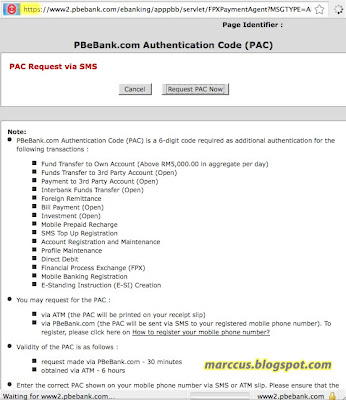
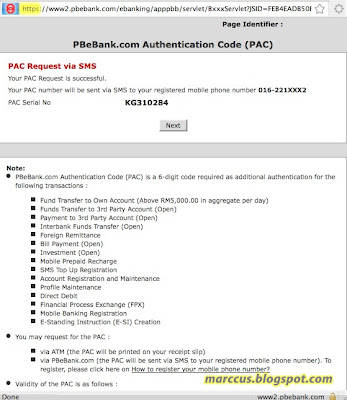
9. For public bank, once you login, it will let you request for PAC instanly.
Click for that. And make sure your phone is turned on, and can receive the PAC number. =X

Click to enlarge


10. Once request, click Next.

Click to enlarge

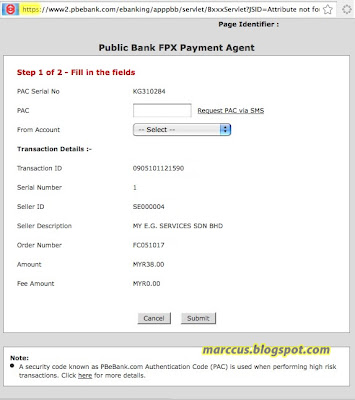
11. and finally reach the place for you to enter the PAC number and select your Account that got money one. After complete, click Submit.

Click to enlarge


12. Once you submit, your MYR 38.00 will debit from your account. Don't cry for this ok? Let's gambateh and earn more money. Hee hoo hee hoo!!
Here, you click Ok, and Print a copy for your record, or just copy down the reference number will do.

Click to enlarge
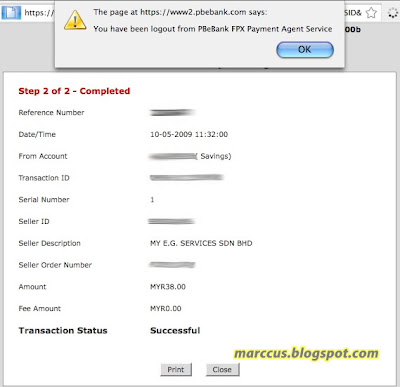


13. Back to the page just now as you not to close one, It will then show you the successful transaction. You can Close or Print. Is better for you to print a copy lar. XD

Click to enlarge
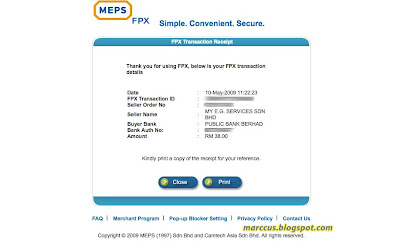


14. Also, the Myeg page will have another record.
Just print it down will do. And you are done!
As you can see at the bottom of this page, if the license have not reach you in two days, can call and sing some song to them. =)

Click to enlarge
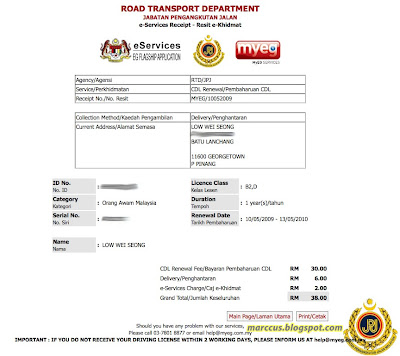


So this is the complete process for online driving license renewal. It may be hard and may be easy. XD

And remember to Clear your Cache for your browser!!
and also turn on back your pop-out blocker.
=X

For a lazy person like me, the RM 8.00 extra is worth for let me spend my time in Post office and drive to there. XD


>>

4.24.2009

NewsGator's NetNewsWire: very nice mac rss reader

Do anyone of you using RSS feed to read news and blog?

Some of my friend like CK, using google reader.
Google read is an online based RSS feeder, which I also using last time.

But after feeling lazy to sign-in everytime, I continue to use the Safari feed, as I getting more time to use my little white recently.

I like to read news and blog updates from friends. and grouping them.
So sometimes will get myself accumulated with lots of unread items and messy also.
Then decided to find a standalone application to feed RSS so that I can no need open Safari all the time and let it accumulate caches.

and found this... tadaa~~


It was develop by News Gator. And NetNewsWire is the free RSS reader from them.
Since I install it and used for couple of days. I find start to love it, cause the simplicity of it. =)


In dock, it will automatic show the number of unread news/updates.
You can see it very clear =)

The layout of this application.
And the grouping is very easy and also make it look neat. =X
As you can see, left panel shows all the grouping, and right panel have split into two more row.
On top will be the title of unread news/updates.
Bottom will be the subtract of that particle news/updates selected.


And if you click on that news/updates, it will show a hidden panel on right where now bring you directly to the website! It's very convenient isn't it? It able to function as web browser also =)
And for blog, you also can post comment under the blog site you're reading. No different as the ordinary web browser.


NetNewsWire also able to refresh itself every 30minutes at least to download the news/updates from the link you subsribe into it.

In case you're urgent and want the news/updates come up faster, you can always right click and refresh manually. =)

It let you simultaneously download 1-10 site at the same time. Which is fast update!


So who ever use Mac and wanted to get a simple, functionable RSS reader to let you up to date for news you want, I can say NetNewsWire are not to be missed!

Or perhaps anyone of you if found a better one, do let me know also ^^


and for Window, Newsgator do have one for you all also. It's called Feed Demon (download). 

Enjoy for being feed and updated all the time =)
>>

4.21.2009

Adding mini antenna into Maxis Huawei E220

If you are my blog reader for long time, you should know my un-rested hand have opened up and do something to the little E220 modem. keke. [Link here] and [Link here..]

While even I do those things, the line still unsatisfied to me, even after the soldering two wires into the heatsink where that time I was though the antenna, haha XD [Related post] The link actually improved then become slow again. =X

So being learned from the stupid act, I now know where the located. And the very recent, I plug off the two wires that soldered previously and restored the mini heatsink in. =X


Then I ordered one mini antenna for about 3.60 USD from ebay last few weeks ago. [Find this item here] and planning to put it on the golden round head in the modem. Tried to improve the signal, again =X hahaha

The item was reached in about two weeks time, which is today, in good packaging and good condition. Yeap, it passed the custom, else I can't get it, haha XD

Then my house ngam ngam blackout, I can't surf net or anything, before I went for interview at noon time, my hand start itching watching the envelope, so... I just have to cracked up the mini modem and snap the mini antenna in, haha XD


The envelope


This is how the head looks like.

Wow, Hitachi one ler~


Opened up
This is where the place I'm gonna put the head

Snapped!!


And finally, I cover up the Maxis plate on top, it still look nice isn't it? Hahaha XD
I don't think I will return the modem to Maxis lar~ haha


Show how's the top speed get?
Actually, I have three method to connect to the line, either by the default application named, Mobile connect, or the third party freeware called CheetahWatch, or the Internet Connection dialer in mac. All of them are working quite well.


Mobile Connect


CheetahWatch
Internet Connect

After the mini antenna added, the line appeared to be more stable than before. But one thing that can't be avoid is, the signal will still dropped out of sudden. Where there is no solution to bite the signal =X

And also, for increase successful connection, I do found out that when connect the modem to the USB port, let it blink from Green to Dark Blue or stay Green for at least 30 seconds (cause sometimes it won't go Dark Blue when no WCDMA/HSDPA signal is detected), then only go press the connect button =X

So.. Folks out there, enjoy if you plan to do the same as me. XD

12.18.2008

marccus cracking again for wireless signal. Poor Huawei e220 modem.

Again.. Since last post (here) about how to improve Wireless Broadband signal using extension method..
Little marccus is again facing annoying by dropping modem recognition and signal's weakness (may be kena capped by maxis coz havt pay the bill for few months, keke..).

There fore. the hands.. goes.. unstable....

And this time, little marccus seems goes a little bit too far with the little modem..
(there will be 23 pictures loading.. prepare and strengthen your connection please, hehe)


The pretty and sexy and charming maxis(R)broadband USB modem


with a knife and big flat head screw driver.. It "poP!". open..
oopS...


This was done in office. little marccus can't open it up yet cause
the screw tower in his room.


You can see there got a layer of stickies to hold the Logo plate.
So when open will become un-easy.


Finally, little marccus back to home and grab the hex-head screw driver and continue..
Looking naked inside..


Sexy~
you can see the antenna at the most right,
there are two hex-head screw locked it.


This is the so called internal antenna (little marccus think).
look how big when compare with little marccus mini finger.

Hey, compare with below one, that later gonna replaced the small thing.
Its like a Big Cock Cock Gai and Small Cock Cock Gai totally different man..


Samsung phone internal antenna
(that little marccus "Rent" from the screen-wire-broken D510)


Wanna see my ass?
There you go, Smell it!


Looks like some part is from South Central America..


Is this round thing contribute to the name of the modem?


Ok, What is the purpose little marccus go crack this thing up?
He was thinking of elongate something out from the antenna area,
so that in future may add a signal booster.
or may be, perhaps, integrated into his lovely iBook G4.
So all these are just a beginning training, kekeke...

Then, some usb wire was cut off..


Refined both 3" and 5" end.. and polymerize both strand.
There will be double stranded wire completed.
(o.O?? is there some terms sound familiar??)


Then little marccus used the soldering device that he borrowed from office,
to stick the mini wire on the place, where small antenna sit before.


Okie, after completed, let put to some test.
The green light got blink blink, mean the circuit board is going fine.


Then stick the Big Cock Cock Gai (BCCG) with the small wire and test.
Still, blink blink green color light is there.


But... wTf... -_-|||
How come this thing appeared!
Is the circuit board kena heat shocked and being reset, when soldering?
X.X die die... faster faster the little marccus sms Jac for help..
And at the same time, he keep on trying
uplug.. plug.. click click, unplug.. touch touch,
plug.. unplug.. plug..

Jac replied that there will need some time to resolve it.
X.X
wakaka, syok then.. Then nevermind lar.
Just go sleep and wait for tomorrow... X.X


But then.. Out of a sudden.
The dark blue light appered! Saviour~~ (what is savoiur?)

Then try using hand to hold the sim card..
Ta daa~~ The cyan light arrived~~
Means the 3G signal is uplinked.


So, this is how the new modem looks like.
Certainly little marccus had break the warranty or whats sort of agreement
hold by maxis. kekeke..
nevermind, since he is going to use the package for quite some time.

The Signal is actually didn't increase much.
Just it become more stable.

So....... the story won't end here, heheheheheh..... (evil "hehe..")


Part II,
still remember in that last post?
That I've make some connection between two USB cabel, that look quite awful ?
So now, since the soldering device is here.
Here I go~ try to make it a little bit more pretty. hehe


So, little marccus have only two hand.
This is how he do when wanted to soldering two wire at the same time.


The table is nearly get burn.. -_-||||
Lucky omitobuddha...


Hey, this looks pretty nice isn't it? ^^


Completed!!


Compare to this one?
How you think?
Got 10% better lar hor?

Updated~


After little marccus ate the Chocolate Brownie, there is a foil..
Then use it to wrap the modem.
See, hoiyo, full bar in the cave-like room. wakaka..


Then little marccus want lansi, so when in office,
off the office punya wifi, and use the maxis one,
Hoho, can reach 1.0Mbps ler.
The speed is similar to land-connected wifi. =)


End of post---

P/S: So... Who ever wanted to try. TRY AT YOUR OWN RISK!
The whole process is really easy to get anything spoilt, get anyone wound, or get anyone high, or whatever danger.
So, Again, TRY AT YOUR OWN RISK!


And I have another new modem as Chritmas present, wakakaka ^^
Jingle Bell~ Jingle Bell~~


Updated post for new method  please visit here>> [Link]